“Tell me and I will forget.
Show me and I will remember.
Involve me and I will understand.
Step back and I will act.”
iOS RestKit Tutorial
by Andreas Eichner, Arseniy Vershinin and Michael Conrads
Table of Contents
1. Introduction
1.1 What is REST
2. How to RestKit
2.2 Overview
2.3 Integrating RestKit
2.3.1 Cocoapods
2.3.2 Manually
2.4 Modelling
2.5 Mapping
2.6 Routing
3. Exercise
4. References
1. Introduction
Twitter, Facebook, Foursquare, Instagram and a lot of other different popular online services have one thing in common. They all offer a RESTful API for developers to write awesome apps on top of it.
There are several ways to deal with such API’s in iOS. One could take a built-in networking framework and just use NSURLConnection to address the server endpoints. Another option would be to take AFNetworking and make the life a little easier. However, there is an even better option out there - a networking library, specifically designed to build RESTful apps, and it is called RestKit.
1.1 What is REST?
Before we dive into RestKit, it is worthy to shortly mention, what is a RESTful API and why it is so important to know how to interact with it.
Imagine, you have a server and you would like the developers to access it. As you probably guessed, there are multiple ways to organise this process. You could think about the protocols that should be used, about the way, your information will be serialised or about organisation of your server endpoints.
Thankfully, smart guys with years of experience already solved most of these problems, and you don’t have to work too hard to design your server API in a consistent and understandable way. Meet REST (Representational State Transfer) - a set of architectural principles, designed for distributed hypermedia systems to share the information with each other. Notice, that there is no mention of a web-service in this description - the concept can be applied to a variety of systems in different ways. However, in this tutorial we will focus on the web implementation of such systems, which implies the following principles:
- Usage of HTTP protocol for information transfer.
- XML or JSON to serialize the data. We will mostly use JSON, since it is way less verbose than XML.
- Base URL. This is a part of the URL, that stays the same for all of your requests.
- Statelessness. It pretty much means, that the client is responsible for providing all the necessary information in the request - server does not save intermediate state of the client’s requests.
- Directory-like URI’s structure. To make this one more clear, we will use a hypothetical example of a service that provides us with information about doggies - doggies.com! As you can see in the table below, to access a dog with a tag 52, you would access a “directory” /dogs/id52 - a very intuitive and straightforward way to organise server resources. What about passing some parameters? They are normally added to the end of the request with a “?” symbol. For example, to find a dog named Chuck, one would send a request to the URL http://www.doggies.com/dogs?name=chuck.
|
Base URL |
Request |
Interpretation |
|
http://doggies.com |
/dogs |
All dogs |
|
/owners |
All dog owners |
|
|
/dogs/id52 |
Dog with id = 52 |
|
|
/dogs?name=chuck |
Dogs named Chuck |
|
|
/dogs?name=chuck&age=2 |
Dogs named Chuck who are 2 years old |
- Usage of HTTP Methods. We’ve already seen how we can get information about the doggies. However, this is not the only task, you would face to interact with the world of the dogs. We also need a way to update, delete and create the information about them. HTTP protocol already provides a perfect way of encoding such intentions - the so-called HTTP methods, which correspond the basic CRUD (Create, Read, Update, Delete) operations. In HTTP these are called POST, GET, PUT and DELETE. The following table provides a basic overview of the effects of such operations.
|
Resource |
POST |
GET |
PUT |
DELETE |
|
/dogs |
new dog |
all dogs |
replace dogs with new dogs |
delete all dogs |
|
/dogs/id54 |
new dog with id = 54 |
show dog |
update dog |
delete dog |
2 How to RestKit
2.1 Overview
Now that you know a bit about the kind of web services, we will be interacting with, it is perfect time to get a better look at RestKit.
As mentioned before, RestKit is an open-source framework that saves you a lot of hassle while dealing with RESTful web services. One of the key abilities of the framework is to transform the requested objects from JSON, XML, or other format into Objective C local objects. This allows you to save a lot of code, that you would typically write, while accessing data on the server.
RestKit also provides you with a well-designed API to access RESTful services and to cache the downloaded data on the device using CoreData. Under the hood the framework uses another well-designed open-source library AFNetworking to provide a better abstraction for interaction with the system’s networking services.
Let’s have a closer look at the RestKit’s most important classes and their main functionality. Do not worry if you don’t understand all the concepts at the first glance - we will describe the concepts in more detail in the further subsections.

RKObjectManager. A go-to class for interaction with the RESTful server and the main configuration holding point. Provides a lot of convenience methods such as
getObject:path:parameters:success:failure:
postObject:path:parameters:success:failure:
which significantly simplify our lives, when working with RESTful services.
RKRouter and RKRoute. Those classes describe how URLs for specific objects and methods (POST, GET etc) should be generated. For instance, if we would like to post our updated doggie with id 52, RKRouter would figure out, that the endpoint /doggies/id52 should be used.
AFHTTPClient. As mentioned before, RestKit relies on the functionality of AFNetworking. AFHTTPClient is a class of this framework, that generates and manages outgoing NSURLRequests and also holds some related configuration such as base URL and HTTP headers, necessary for communication with the required service.
RKObjectMapping. Describes the way a JSON or XML object should be transformed to an Objective C object.
RKResponseDescriptor and RKRequestDescriptor. Both of these classes hold an object mapping and describe circumstances and conditions, when this object mapping can be applied for serialization of received/sent objects.
RKObjectRequestOperation. A class that encapsulates all the important information about the request such as an instance of NSURLRequest about to be sent and a response descriptor that should be used to map the requested information.
RKManagedObjectStore. This class becomes important, when you want to use CoreData to save the downloaded information on the device. It encapsulates the configuration, necessary for the RestKit to interact with the desired CoreData store.
Of course, the described classes cover only a fraction of the RestKit’s class hierarchy, but they should be enough for you to understand the main interaction points of the framework.
2.3 Integrating RestKit
To integrate RestKit in your application there are basically two methods:
CocoaPods (automatic) - CocoaPods handles the linker flags, header paths, and download of source code dependencies on your behalf.
Submodule (manual) - This method involves adding a submodule to your project and building RestKit as a dependency. You are responsible for configuring the project appropriately.
2.3.1 CocoaPods
Create a Podfile and configure library dependencies.
Open Terminal and run the following commands:
$ cd /path/to/MyApplication$ touch Pofile
$ open -e Pofile
The podfile should look like this:
platform :ios, '7.1'
pod 'RestKit', '~>  0.22'
Further information about the structure of a podfile can be found here.
The Podfile only has to be created once (and maybe updated). After that every developer who checks out the project only has to execute the following command to integrate RestKit:
$ pod installCocoaPods downloads the 3rd-party code and creates a new .xcworkspace.
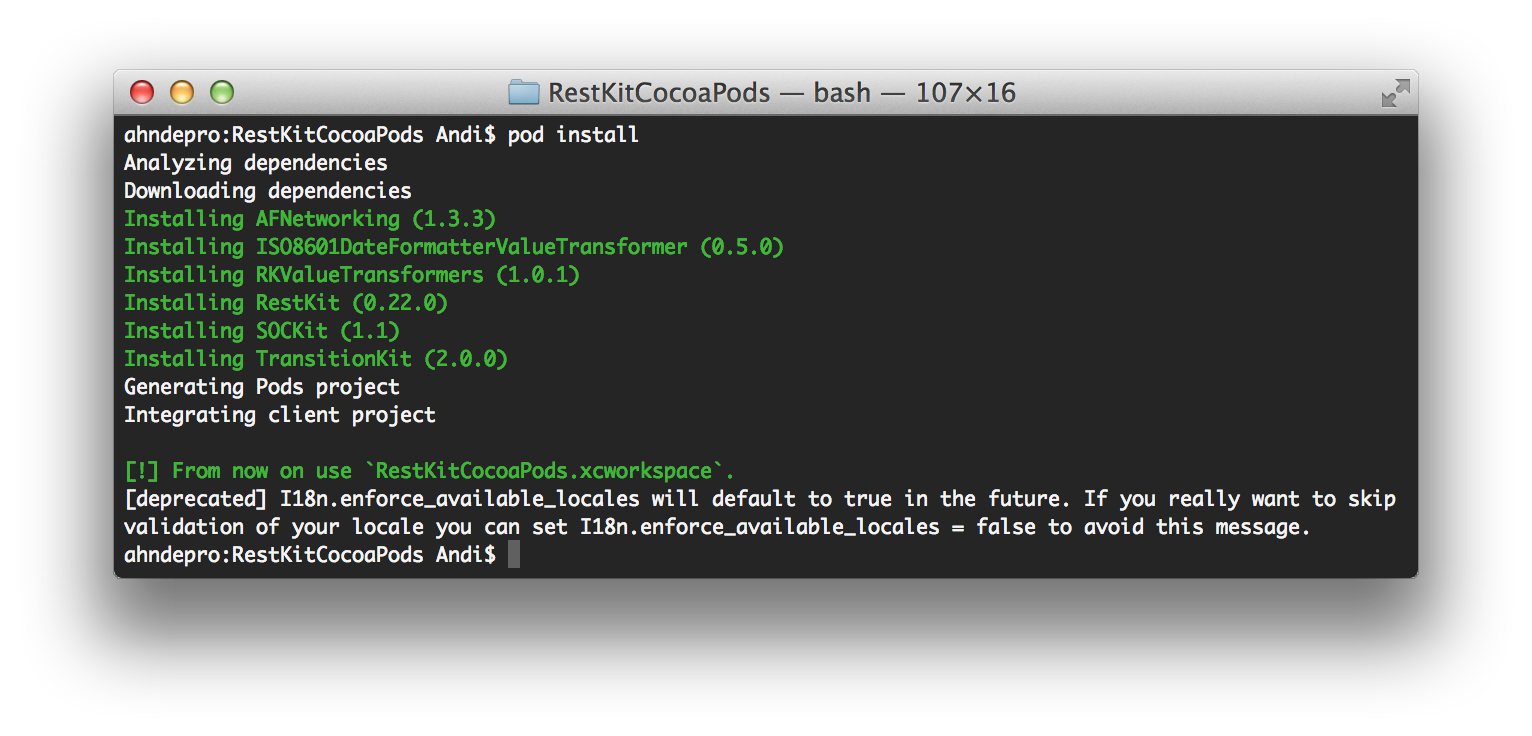
From now on, you use the .xcworkspace file to open your project in Xcode.
(For more information about CocoaPods click here)
2.3.2 Submodule
Adding the Submodule
The first step of the installation is to add the submodule to your project, either by downloading RestKit manually directly or by downloading it via basic git commands:
$ cd /path/to/MyApplication
# If this is a new project, initialize git...
$ git init
$ git submodule add git://github.com/RestKit/RestKit.git
$ git submodule update --init --recursive
$ open RestKit
You can substitute an alternative branch (i.e. development) via the -b switch to the git submodule invocation.
(i.e. git submodule add -b development git://github.com/RestKit/RestKit.git)

Adding RestKit to Your Project
Now that you have cloned RestKit into your project, you need to let your project know about RestKit by adding it to your project Workspace. Find the RestKit.xcodeproj file inside of the cloned RestKit project directory and drag it into the Project Navigator (⌘+1).

Configuring Your Target
Now that your project is aware of RestKit, you need to configure a few settings and add some required Frameworks to your project's build configuration. Click on the top-most item in the Project Navigator to open the Project and Targets configuration pane.
Then click on the Build Settings item and input "other linker flags" into the search text box in the top right of the main editing pane. Double click on the build Setting titled Other Linker Flags. A panel will pop open prompting you to input the Linker Flags you wish to add. Input -ObjC -all_load and hit Done.

After configuring the Linker Flag, clear the text from the search box and input "header search path". Double click on the build setting titled Header Search Paths. A panel will pop open prompting you to input the Header Search Path you wish to add. Input "$(BUILT_PRODUCTS_DIR)/../../Headers". Be sure to include the surrounding quotes (-- they are important!) and hit Done.

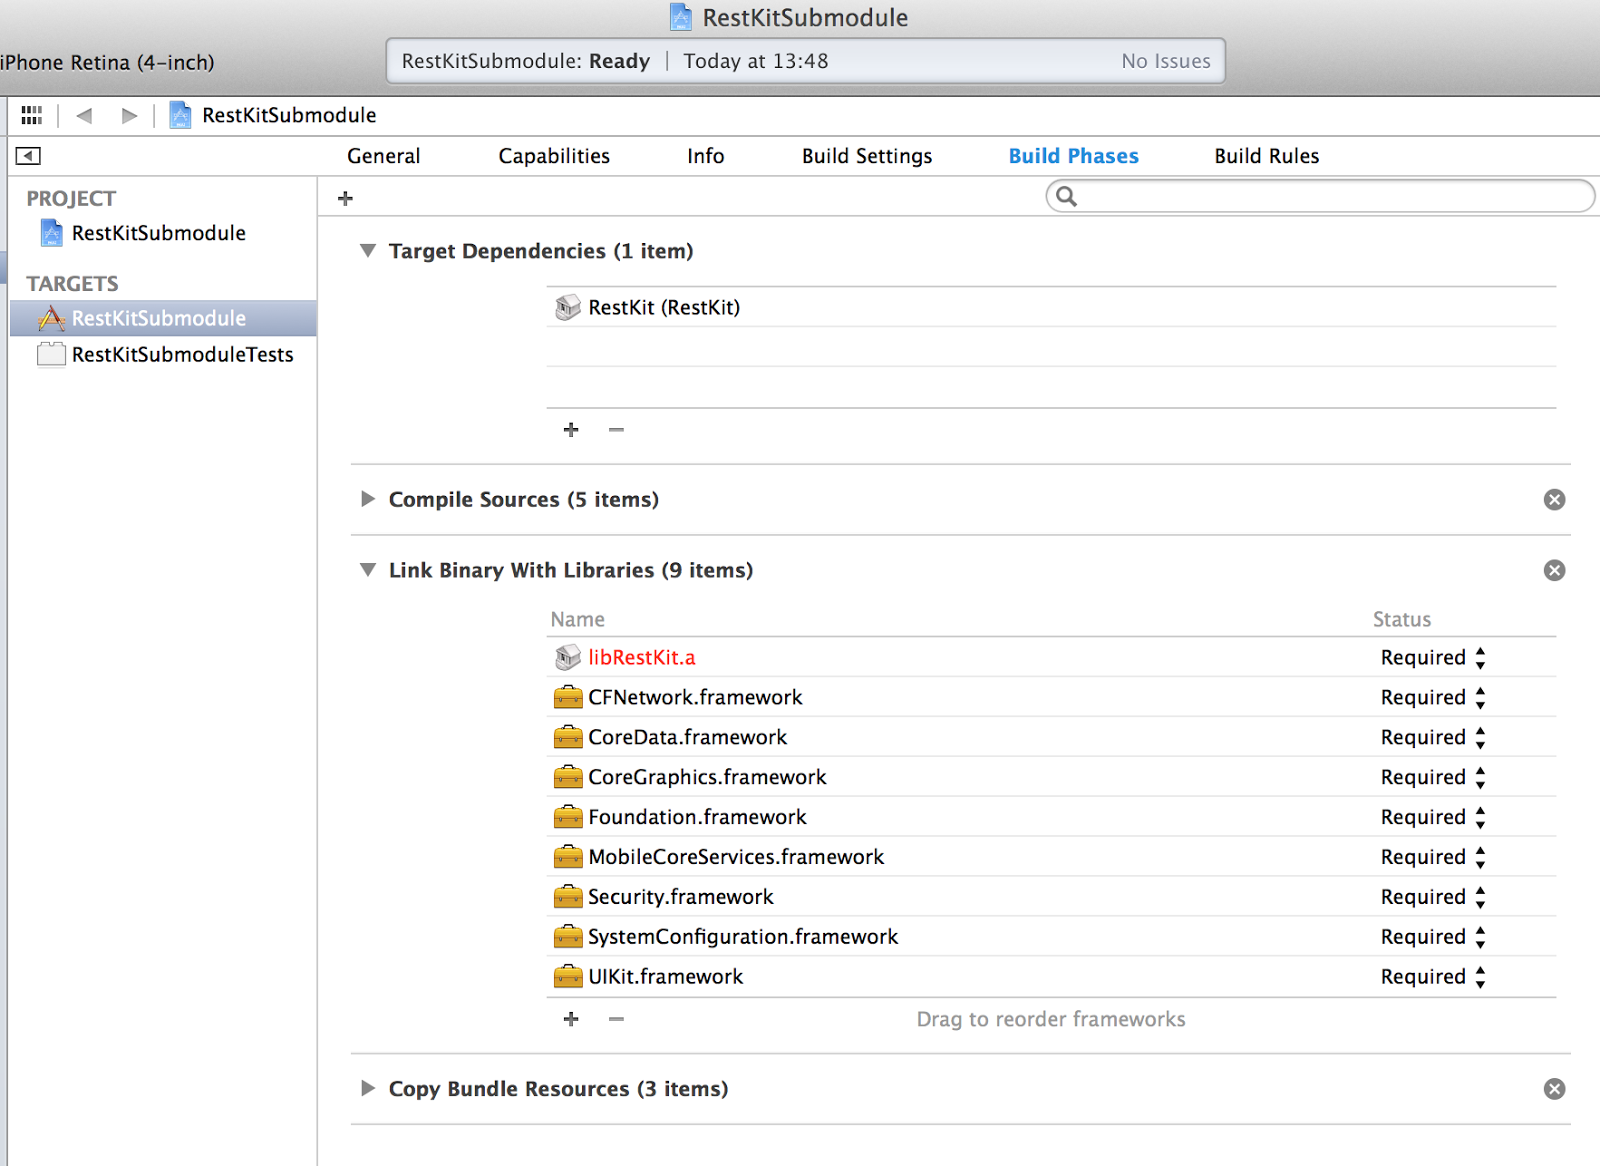
Now click on the Build Phases tab and click the disclosure triangle next to the item titled Target Dependencies. A sheet will pop open asking you to select the target you want to add a dependency on. Click the RestKit target and hit the Add button.
Once the Target Dependency has been configured, you now need to link the RestKit static libraries and the required Frameworks into your target. Click the disclosure triangle next to the item labeled Link Binary With Libraries and click the plus button.
Select the RestKit static libraries appropriate for your configuration. The appropriate libraries to select depends on the platform you are targeting:
libRestKit.a - RestKit for iOS static library
Now you need to add linkage to the required Apple provided frameworks as well. Click the plus button again and select the following Frameworks from the iOS section of the framework selection sheet:
CFNetwork.framework on iOS
CoreData.framework
MobileCoreServices.framework on iOS or CoreServices.framework on OS X
Security.framework
SystemConfiguration.framework
Updating the Precompiled Header File
You now need to update your project's Precompiled Header File to include the System Configuration and Core Services header files to avoid build warnings emitted from AFNetworking. The precompiled header file is placed in the Supporting Files group in your Xcode project by default. It is generally named after your complete project/target with the extension .pch. In the example project used to build this guide named "RestKit Installation", Xcode generated a precompiled header file named "RestKit Installation.pch". Once you have found your PCH file, replace the contents of the current #ifdef __OBJC__ with the following example code:
#if __IPHONE_OS_VERSION_MIN_REQUIRED
  #ifndef __IPHONE_5_0
    #warning "This project uses features only available in iPhone SDK 5.0 and later."
  #endif

  #ifdef __OBJC__
    #import <UIKit/UIKit.h>
    #import <Foundation/Foundation.h>
    #import <SystemConfiguration/SystemConfiguration.h>
    #import <MobileCoreServices/MobileCoreServices.h>
  #endif
#else
  #ifdef __OBJC__
    #import <Cocoa/Cocoa.h>
    #import <SystemConfiguration/SystemConfiguration.h>
    #import <CoreServices/CoreServices.h>
  #endif
#endif
You have now completed the installation of RestKit into your application. To verify the installation, open up your App Delegate and add an import of the RestKit header:
#import <RestKit/RestKit.h>
Build your project (⌘+B) and then switch to the Log Navigator view (⌘+7) and verify the build output. Your project should build cleanly without any issues. Congratulations! You have now successfully installed RestKit!
2.4 Tutorial App
It's time to apply our theoretical knowledge to a practical example! We are going to build an app which displays a list of famous programmers and a list of languages the person worked in. The data is provided by a web server with a REST api.
 |
|
 |
|
→ |
||
|
|
The URLs of the REST server are
| list of all persons | |
| person with identifier 1 |
You are encouraged to look at the JSON in the browser of your choice at any time in the tutorial. Copy-Pasting the keys from the JSON can prevent typos!
Our app provides two classes which represent the data of the JSON response, the MCOPerson and the MCOProgrammingLanguage class. We will use RestKit to request the JSON and map it to our Objective-C classes.
To display a list of programmers, we need to complete the following tasks:
- Create an ObjectManager
- This is our main actor - Setup Mapping
- Specify the mapping from JSON to our classes - Tie Mapping to ObjectManager with a ResponseDescriptor
- Tell the ObjectManager to use our mapping - Request JSON from the server
- RestKit handles everything from this point on
RKObjectManager
The RKObjectManager is the main actor in RestKit, which ties all components like mapping or routing together. It is used to issue requests and provide mapped responses to the server. Although it has a +sharedManager method, indicating a singleton, it does not prevent the user from instantiating multiple managers. The last one instantiated will be returned if you call +sharedManager again.
Creating an ObjectManager is fairly easy!
NSURL *baseURL = [NSURL URLWithString:@"serverurl"];
RKObjectManager *objectManager = [RKObjectManager managerWithBaseURL:baseURL];
2.4.1 Mapping
With our ObjectManager set up, we are ready for step 2: Mapping. We told RestKit the baseURL of the server, but now we have to tell him which classes the JSON represents. This is done via a RKObjectMapping. The ObjectMapping stores the information how to map JSON like this:
{
“json_first_name” : "Linus",
“json_last_name”  : "Torvalds"
}
to a Model like this:
MCOPerson *person = [[MCOPerson alloc] init];
p.firstName = @"Linus";
p.lastName = @"Torvalds";
The RKObjectManager uses Key-Value-Coding to assign values from JSON to your model objects. You have to provide the keys for the JSON object and the Objective C property names, so the ObjectManager knows which entries to map. This mapping is created via an RKObjectMapping instance. There are two ways to specify the mapping. You can add a mapping as an NSArray of NSStrings or an NSDictionary with keys and values NSStrings as well. If you use an NSArray, the keys in the JSON as well as your properties must have the same name. If you want to use different names in your Objective C classes (which is most of the time the case) you use an NSDictionary to contain the mapping information.
Here is an example of how to create an RKObjectMapping for the MyClass model and provide the mapping informations:
RKObjectMapping *mappingForMyClass = [RKObjectMapping mappingForClass:[MyClass class]];

NSDictionary *mappingDict = @{
   @"json_name" : @“objectiveCname"
};
//add the mapping to the manager
[mappingForMyClass addAttributeMappingsFromDictionary:mappingDict];
The last piece is the RKResponseDescriptor. It "describes" a response from a server, connecting the right mapping to the response of specific requests.
RKResponseDescriptor *responseDescriptor =
[RKResponseDescriptor responseDescriptorWithMapping:myMapping
                                             method:RKRequestMethodGET
                                        pathPattern:@“/RESTpath"
                                            keyPath:nil
                                        statusCodes:RKStatusCodeIndexSetForClass(RKStatusCodeClassSuccessful)];
[objectManager addResponseDescriptor:responseDescriptor];
Now you have all the knowledge you need to display the first list of programmers!
Open the RestKitTutorial.xcodeproj project and navigate to MCOPersonProvider.m
Complete TODOs 1 to 5
The solution can be found here
But where did we make the actual request to the server? In MCOPersonProvider.m, look at
- (void)fetchAllPersonsWithCompletionHandler:
(MCOPersonProviderFetchAllPersonsCompletionHandler)completionHandler
{
    [self.objectManager getObjectsAtPath:@"/person"
                              parameters:nil
                                 success:
     ^(RKObjectRequestOperation *operation, RKMappingResult *mappingResult)
     {
        completionHandler(mappingResult.set, nil);
     }
                                 failure:
     ^(RKObjectRequestOperation *operation, NSError *error)
     {
        completionHandler(nil, error);
     }];
}
the method
- (void)getObjectsAtPath:(NSString *)path
              parameters:(NSDictionary *)parameters
                 success:(void (^)(RKObjectRequestOperation *operation, RKMappingResult *mappingResult))success
                 failure:(void (^)(RKObjectRequestOperation *operation, NSError *error))failure
allows us to make GET-requests to specific paths, in this case @"/person", which is appended to the baseURL and returns an array of persons . The mappingResult contains our mapped objects.
2.4.2 Routing and Relations
Routing
By now, you should see a list of programmers, but a tap on each one does not reveal any further information...yet. For once, the JSON does not contain any more data, so we have to request more data for each one of them. This can be accomplished with an RKRoute object.
 RKRoute *myRoute = [RKRoute routeWithClass:[Person class]
                                pathPattern:@“person/:identifier"
                                     method:RKRequestMethodGET];
A route combines a class with a pathPattern and a Request-Method like GET or POST. If we add myRoute to the objectManager, it knows that if we tell him to GET a Person, it appends "/person/<identifier of the person>" to the basePath. First of all, how do we add the route to an objectManager?
[objectManager.router.routeSet addRoute:myRoute];
And how does the objectManager know which person to get? Where does the identifier come from?
The identifier is a property of the PersonClass. And the objectManager has the method
- (void)getObject:(id)object
             path:(NSString *)path
       parameters:(NSDictionary *)parameters
          success:(void (^)(RKObjectRequestOperation *operation, RKMappingResult *mappingResult))success
          failure:(void (^)(RKObjectRequestOperation *operation, NSError *error))failure;
This method is like the -getObjectsAtPath:parameters:success:failure: method, except it takes an object, in this case an instance of a Person as an argument, not a NSString. Imagine you want to request more information for a Person with the identifier 3. You know it's 3 from our previous request which returned all persons. You just have to pass the generated Person from our first request to -getObject:path:parameters:success:failure: and it will return a Person with the additional fields mapped to the detail-response from the server. Alternatively, you can create a new, "empty" Person object, assign 3 to the identifier and pass that one to the -getObject
Relations
We are now able to request the JSON with all the informations for one Person, which looks like this:
{
"json_first_name": "Linus",
"json_last_name": "Torvalds",
"json_identifier": 1,
"json_languages":
   [{
      "json_language": "C"
    },
    {
      "json_language": "C++"
    }]
}
But the knownLanguages property is still nil! RestKit doesn't know that each Person has an array of languages. To tell RestKit about the relation between a Person and ProgrammingLanguages (1 to many) we need to create a RKRelationshipMapping.
You can create a RelationShip like this (not the one between humans, that is more difficult than this):
RKRelationshipMapping *childRelationship =
[RKRelationshipMapping relationshipMappingFromKeyPath:@“json_relation"
                                            toKeyPath:@“objCname”
                                          withMapping:childMapping];

[parentMapping addPropertyMapping:childRelationship];
You can read this method like: "Map everything in the JSON object under the key "json_relation" to NSObjects with the mapping childMapping and insert it in the array found in the parent object with the name "objCname". Finally, you connect this relationship to the mapping of the parent object (in the example parentMapping, which is a RKObjectMapping, as is childMapping). Notice, that you add relationships with the method -addPropertyMapping: to another mapping (the mapping for the parent object in a tree-like representation)
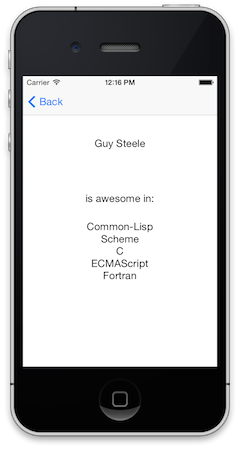
With this knowledge, we are ready to request further details for each person in a detailview.
Complete TODOs 6 to 12 in the MCOPersonProvider.m
The solution can be found here
If you tap on a Person now, you should see:
3. Exercise
Finally after understanding the concept of RestKit here is a small exercise to tighten your skills with this framework.
The goal is to implement with a few hints your own application with RestKits mapping and routing.
The application communicates with the RESTful API of Github and will visualise the recent public gists on the iPhone.
This is how the public gists are shown on the webpage of Github itself:
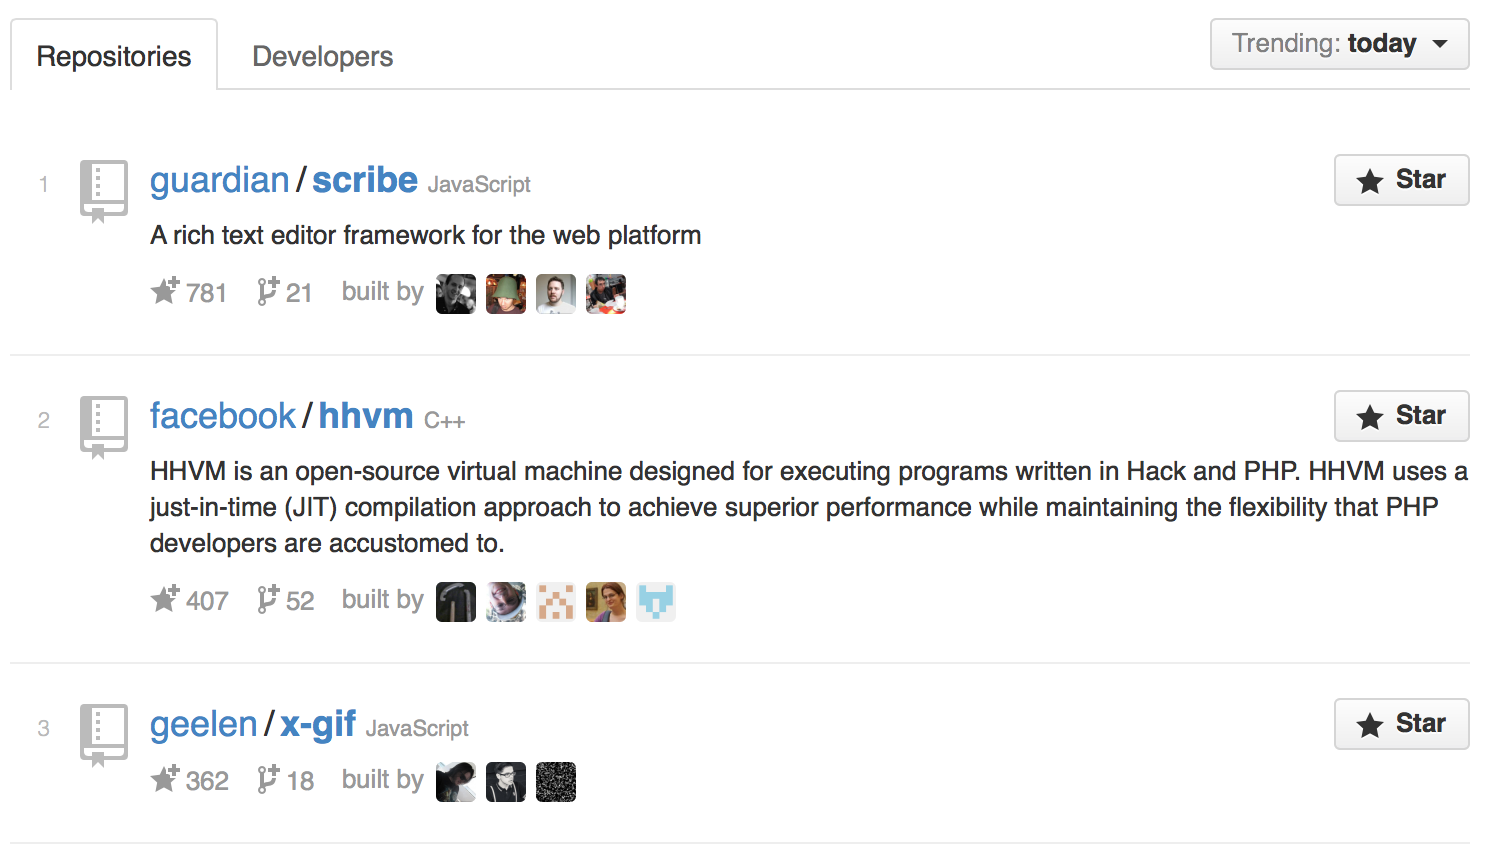
And these gists are represented in a JSON-object like this:
[
  {
    "url": "https://api.github.com/gists/9686524",
    "forks_url": "https://api.github.com/gists/9686524/forks",
    "commits_url": "https://api.github.com/gists/9686524/commits",
    "id": "9686524",
    "git_pull_url": "https://gist.github.com/9686524.git",
    "git_push_url": "https://gist.github.com/9686524.git",
    "html_url": "https://gist.github.com/9686524",
    "files": {…},
    "public": true,
    "created_at": "2014-03-21T13:41:43Z",
    "updated_at": "2014-03-21T13:41:44Z",
    "description": "Center mass of SVG path elements",
    "comments": 0,
    "user": {…},
    "comments_url": "https://api.github.com/gists/9686524/comments"
  },
  …
]
(The current JSON object can also be seen here)
Your target is to fill the gaps in the given project, so that the application will show the gists on the iPhone:
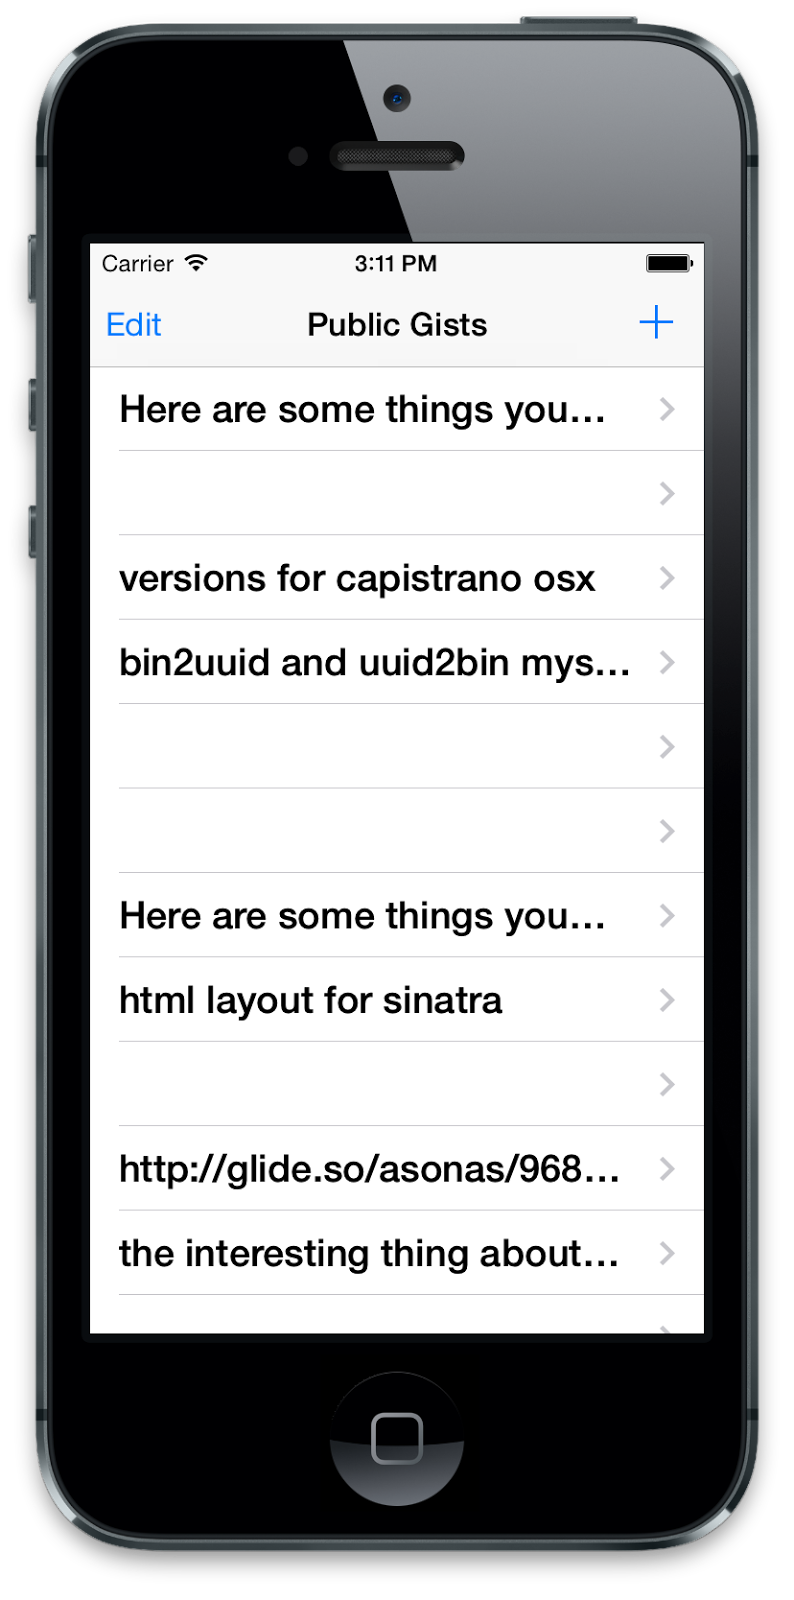 |
|
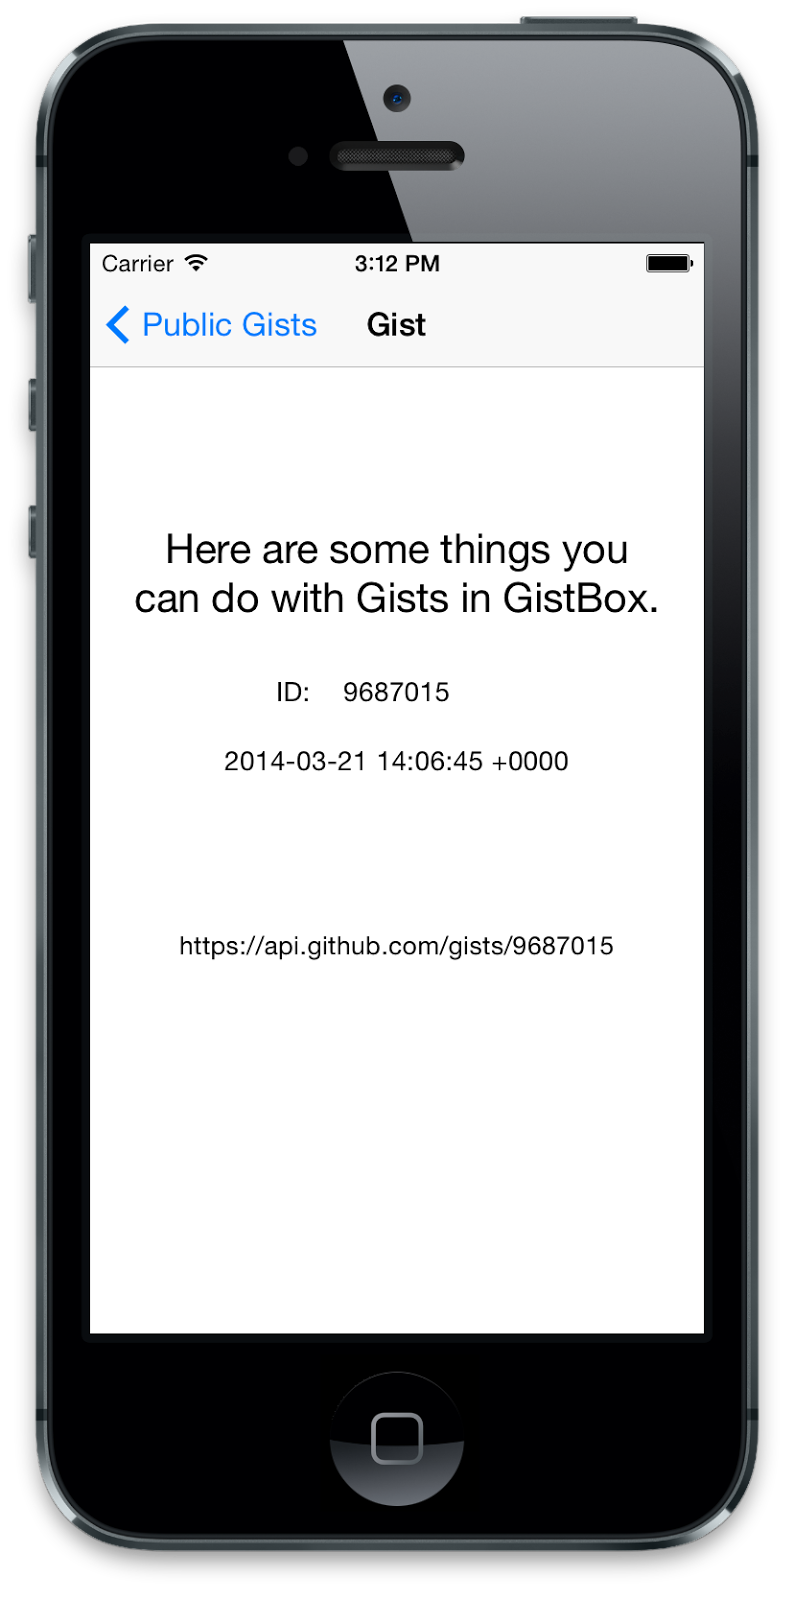 |
|
→ |
||
|
|
Therefore, download the exercise project here and open the RESTkitGithub.xcodeproj:

(RestKit was integrated as a Submodule, so the project should compile, before changing anything, and show an empty list.)
Go to RKGHMasterViewController.m and solve all TODOs.
Good Luck and have fun!
The solution project can be found here.
4. References
| CocoaPods: | http://cocoapods.org |
| Github Developer: | http://developer.github.com/v3/ |
| Podfile Syntax: | http://guides.cocoapods.org/syntax/podfile.html |
| Public Gists: | https://api.github.com/gists/public |
| REST: | http://www.ics.uci.edu/~fielding/pubs/dissertation/rest_arch_style.htm |
| RESTful API: | https://blog.apigee.com/detail/restful_api_design |
| RESTful Webservices: | https://www.ibm.com/developerworks/webservices/library/ws-restful/ |
| RestKit: | http://restkit.org |
| RestKit - Download: | https://github.com/RestKit/RestKit/archive/development.zip |
| RestKit - Github: | https://github.com/RestKit/RestKit |
| RestKit - Tutorial: | http://www.raywenderlich.com/13097/intro-to-restkit-tutorial |