“Tell me and I will forget.
Show me and I will remember.
Involve me and I will understand.
Step back and I will act.”
iOS Multiplayer Games - Tutorial
Author: Magnus Jahnen, student at Technische Universität München
Introduction
Multiplayer games are very popular with customers for nearly 40 years now since the first multiplayer games emerged. This is also perceivable in the App Store, there are hundreds of multiplayer games and some of them are really appreciated.
In iOS Apple gives us multiple possibilities to implement a multiplayer game. We will have a further look into two Frameworks we can use to achieve our goal. The first one is the Game Center and the second the MultipeerConnectivity Framework.
To follow the code examples in this tutorial you will need Xcode 5 and iOS 7.
Introduction: Game Center

Game Center is an online multiplayer social network developed by Apple. It was launched in september 2010 as part of the iOS 4.1 platform. With iOS 4.2 it also became available for iPad and in July 2012 it became also available for OS X as part of the OS X Mountain Lion release. With Game Center you can easily find other players for a multiplayer session via matchmaking or by inviting friends. Other features are tracking achievements, comparing your high scores on a leader board or sending your friends challenges.
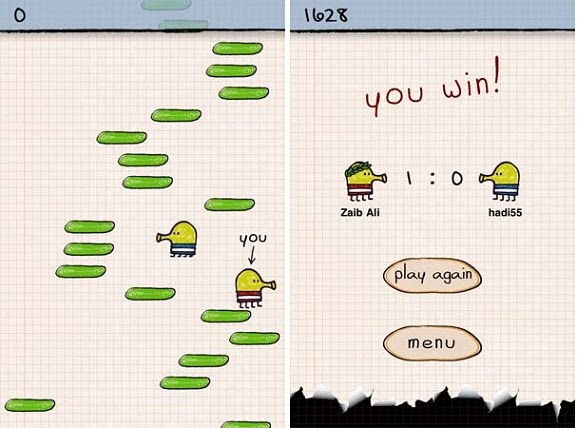
Game Center supports real time and turn based matches. A real time multiplayer game is a game where all players are playing at the same time. That means that they can interact with each other directly during the game play. That means they all have to be online at the same time. Examples are Doodle Jump or Real Racing 3.


In a turn based match the players do not have to be online simultaneously. Instead it uses a store and forward principle, where one player takes his turn and then passes the play to another player. The game state is then saved an transmitted to the Game Center server. The other players are notified about this change and then can take their turns. This kind of match is for example useful when implementing classical board games, like chess. Examples are Word Rally and Carcassonne.


We will only take a look at real time multiplayer games.
Introduction: MultipeerConnectivity

MultipeerConnectivity is a framework introduced in iOS 7. Currently it is not available in OS X unlike the Game Center. It provides support for discovering nearby iOS devices and exchanging data via Bluetooth or Wifi. It replaces the facilities in the GameKit Framework to communicate with nearby devices which are marked as deprecated as of iOS 7. The underlying infrastructure for communicating with nearby devices is automatically chosen by the Framework and the provided API to use MultipeerConnectivity is completely independent from it. That means you do not have to bother about Bluetooth or Wifi being used in the current session. It provides support for exchanging message and stream based data and resources such as files.
Motivation
So why would you implement a multiplayer game? Obviously, because multiplayer games are fun! They can fascinate players even if they have finished the storyline of your game. Moreover players love being social. They prefer real interaction with other players to just playing with or against the computer.
The Game Center and the MultipeerConnectivity both have very simple API which is easy to use. They also have a highly abstracted networking interface which makes it easy to exchange data between the partners of a session. This means that you do not have to think about for example connecting to a partner via TCP, this will handle the Framework for you.
Furthermore when using Game Center you are using Apples server infrastructure and you do not need your own. Game Center already has a wide community (about 67 million members according to Wikipedia). It is available for iOS and OS X, so iOS users can play with OS X users and there are more game related features like voice chat available.
General Information
Network layer
A Multiplayer game's communication is mostly based on layer 4 in the OSI model. Layer 4 is also called the transport layer. There are two different protocols in this layer, the Transmission Control Protocol (TCP), a connection oriented protocol for exchanging stream based data. It is reliable meaning that data is guaranteed to be delivered in the order they were sent. It has a pretty high overhead and thus can be very slow. The second protocol is the User Datagram Protocol (UDP) which is connection less, unreliable, offering exchange for package based data. It has a lower overhead than TCP, so the transmission speed can be faster than with TCP.
Problems which need to be faced
In a multiplayer game multiple instances of the game have to be synchronized simultaneously. Due to the network reliability and latency this is in general not possible. Due to these restrictions you should spend extensive work on designing, implementing and testing your multiplayer game!
There are a few simple tips which can help you to develop a good multiplayer game. First, you should always handle network disruptions properly, especially on mobile devices or when using a mobile network. These will definitely occur! Second, you should send packages to your partner at the lowest frequency possible. That means that you should only send data when it is really needed and you should not send the same information twice or even more often! Remember, your game updates the game scene at 30 or even 60 fps, but the network code should not! Moreover you should use the smallest package size possible, for example if you have a value between 1 and 10, you can represent it with only 4 bits instead of using a 32 bit NSInteger. You should also send the data only to players who really need it.
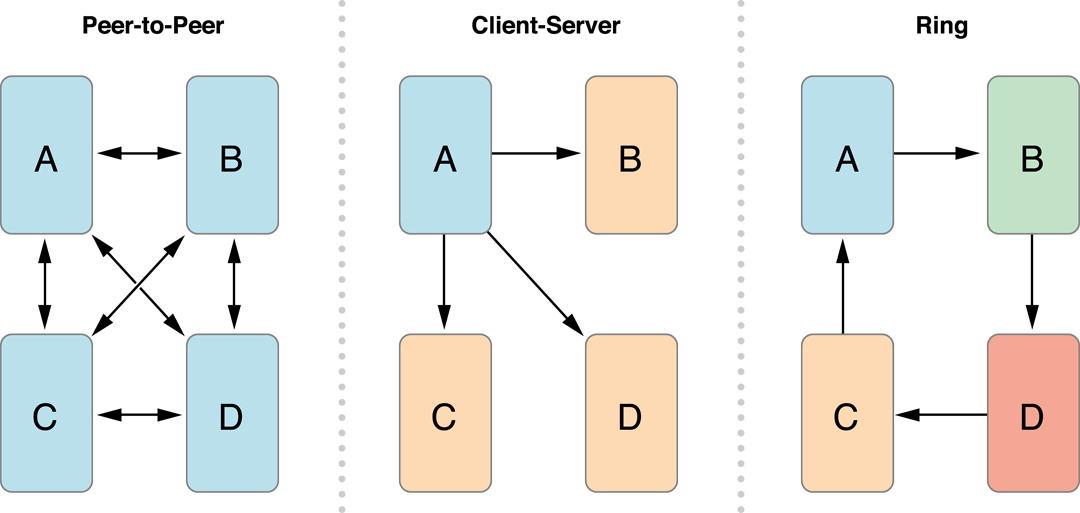
Here are some network topologies, you could use:

The Peer-to-peer solution is the easiest to implement, but it also has the most network traffic. Client-server and Ring topologies are more complex to implement, but try to save network traffic.
What we will do now
We now want to adapt a simple SpaceInvaders game to a real time multiplayer game which supports two players. Player one controls the spaceship at the bottom of the screen and player two can spawn new aliens by touching on the screen. Player one than, has to try to avoid these aliens.

How to support both Frameworks at the same time
As said in the introduction, we want to support the Game Center and the MultipeerConnectivity Framework to be able to play with other people. Therefore we need some strategy to support both Frameworks at the same time. The solution to this is very simple but also very elegant. We are using a simple strategy pattern.

As you can see the MultiPlayerHelper class holds an attribute of the protocol Communication, which either can be GameCenterCommunication or MultiPeerCommunication. Using this approach our MultiPlayerHelper, which by the way is a singleton, is completely independent from a specific communication implementation. You could also add another class which inherits the protocol Communication if you neither want to use Game Center nor MultipeerConnectivity. We can even change this communication easily at runtime!
Before we start
Debug builds are using the Sandbox environment of Game Center. That means we are actually not testing on the real Game Center servers, the Apps from the App Store are using. That makes sense because we are still in development and do not want to publish information about our game and Apple does not want us to test things on the production servers. The only problem with the Sandbox is that it is sometimes offline and then we are not able to test our game over the Game Center. You can check the online status of the sandbox with the link in the section Helpful link.
The examples in this tutorial are based on an example application you can download here. All our exercises are marked with warnings (TODOs) so you can easily jump to them using the Xcode error window.
Game Center
Overview
There are three important classes you have to know about when searching a match in Game Center. The GKMatchRequest and the GKMatchmakerViewController for searching a match. The class GKMatch then represents the actual match which was found.
The GKMatchRequest holds important information about how the match should look like. The two properties maxPlayers and minPlayers for example describe the amount of players your game support. These two properties have to be set. The are many more, we will not use.
The GKMatchmakerViewController shows a standard ViewController to find other players. But you can also implement your own ViewController to find a match, if the look and feel of the standard ViewController does not fit into your game for example. We will use the GKMatchmakerViewController.
The GKMatch provides a peer-to-peer network between a group of players. You can send and receive game or voice data with an instance of GKMatch.

In the UML diagram you can see the structure and interaction of the classes with each other. The GameCenterCommunication class has a reference to the ViewController and the GKMatch. They both tell the GameCenterCommunication class about certain events via delegation. The GKMatchRequest is needed by the GKMatchMakerViewController to find a corresponding match. It has two required properties, minPlayers and maxPlayers.
Finding Players
To find players in Game Center the Frameworks provides, like already stated above, a standard ViewController for us which is very easy to use. Here you can see a screenshot of this ViewController:

So lets now implement the method findMatch in GameCenterCommunication.m (TODO 1).
- (void)findMatch {
NSLog(@"Searching a match ...");
#warning TODO 1a initialize a GKMatchRequest and set the maxPlayers and minPlayers properties
GKMatchRequest *matchRequest = [[GKMatchRequestalloc] init];
matchRequest.maxPlayers = 2;
matchRequest.minPlayers = 2;
#warning TODO 1b present the ViewController
GKMatchmakerViewController *mmvc = [[GKMatchmakerViewControlleralloc] initWithMatchRequest:matchRequest];
mmvc.matchmakerDelegate = self;
[Helper presentViewController:mmvc];
}
As you can see the first thing we do is, initializing a GKMatchRequest. Then we are setting the required properties. We only support two players so we needed at least (minPlayers) two but not more (maxPlayers).
After that we just initialize a GKMatchMakerViewController with the match request. We have to set the delegate to self, because we want to get notified about certain events. Then we just show the ViewController to the user.
After that we have to implement the delegate method from the protocol GKMatchMakerViewControllerDelegate. This is already done in the example application, but we should shortly have a look at it.
#pragma mark GKMatchmakerViewControllerDelegate
- (void)matchmakerViewControllerWasCancelled:(GKMatchmakerViewController *)viewController {
NSLog(@"matchmaking cancelled");
[Helper dismissViewController];
[self.delegate communicationStrategyDidCancelMatch];
}
- (void)matchmakerViewController:(GKMatchmakerViewController *)viewController didFailWithError:(NSError *)error {
NSLog(@"Error finding match: %@", error);
[Helper dismissViewController];
[self.delegate communicationStrategyDidEndMatch];
}
- (void)matchmakerViewController:(GKMatchmakerViewController *)viewController didFindMatch:(GKMatch *)match {
NSLog(@"found match!");
[Helper dismissViewController];
self.currentMatch = match;
match.delegate = self;
[self lookupPlayers];
}
There are three required methods to be implemented. The first one tells us whether the user clicked the cancel button. We then just dismiss the ViewController and tell our presenting game scene about this event. When an error occurs we do exactly the same. In a real game you should maybe tell the user about the exact error and give some hints to solve the problem, but for this example application we want to keep things simple. The last method is the most important, it tells us when a match could be found. We get an instance of GKMatch as a parameter. We also dismiss the ViewController, cache the GKMatch for later use (sending data), and set the delegate, because we want to be notified if new data was received or the player disconnected. After that we just look up the name of our opponent.
If you now run the game you should see the ViewController if you click on play in the main menu. If you for example cancel the matchmaking you should also see the appropriate message on the console output window in Xcode.
Network Communication
Now it is time to implement the communication between the devices. Therefore the class GKMatch offers us a method sendData which takes an object of NSData, which is basically just an array of bytes. These bytes represent the data which shall be transmitted. Data can be sent reliable (TCP) or unreliable (UDP). Here your knowledge from the section Network Layer is useful. Receiving data can be achieved via setting the delegate property of the class GKMatch. Then the method match:DidReceiveData:fromPlayer: is called every time there is new data available. The interesting thing is that this method is independent of the sending mode. That means you do not know if the data was sent reliable or not.
As you know reliable sending guarantees the delivery and avoids out of order packages. Thus it is very easy to use. You do not have to bother about things like retransmission or reordering packages. The only disadvantage is that it may be slower than unreliable sending. Hence it should be used for infrequent messages which must reach their destination.
Unreliable sending is mostly faster than reliable sending and has a lower latency. But there is now guaranteed delivery, so messages can get lost and never reach it's destination. It also can happen that packages will not be delivered in the other they were sent. As a consequence it should be used for real time updates, like position updates of a player.
Now we are coming to our next exercise (TODO 2). We have to implemented the method sendEnemySpawnedMessage in MultiPlayerHelper.m. This message will tell the other player which alien and where it has spawned.
- (void)sendEnemySpawned:(int)enemyIndex atPosition:(CGPoint)position {
#warning TODO 2 send when an enemy/alien spawned
CGPoint relativePosition = [selfgetRelativePosition:position];
EnemySpawnedMessage *message = [[EnemySpawnedMessagealloc] initWithEnemyIndex:enemyIndex atPosition:relativePosition];
[selfsendMessage:message];
}
First thing we do is getting the relative position. This is needed because we want to support different display families, for example iPad and iPad Retina. Thus we cannot just send the position we get from the touch! Then we instantiate a EnemySpawned message with the information we got passed into our method. After that we call a helper method to send out message. This message is sent reliable!
After that we have to implement the other side. That means we have to parse the message and notify our presenting scene about the changes. So let's head over to exercise 3.
- (void)parseEnemySpawnedMessage:(EnemySpawnedMessage *)message {
#warning TODO 3 parse the enemy message
CGPointabsolutePosition = [selfgetAbsolutePosition:message.position];
[self.networkDelegate enemySpawned:message.enemyIndex atPosition:absolutePosition];
}
This method is pretty simple, because parsing the actual byte array interpretation is done by the specific message implementation. We just have to get now the absolute position on our screen. After that we simply call a delegate method to notify our game scene about the spawned alien.
Now there is only one thing missing. The position updates of the spaceship. This is a good example where unreliable packages can be useful, because whenever the player moves his position is updated multiple times per second. The only things we have to deal with are the problems of sending unreliable.
Lost packages: We just ignore this problem. When a package is lost, we can be sure that we will shortly get the next message because of the high frequency of position updates. That means that the user will not even notice this little lag.
Out of order packages: This problem is a bit more complex. If we receive a package which is older than a package we already received, we would display outdated information. This is bad! That means that we always want to display the most recent information we got. Therefore we include a message counter in our player position update message. We also have a property in our class which represents the number of the package we expect. Every time a we receive an update message we compare the message counter with the expected counter in our class. If our expected counter is bigger or equal (messages can also be delivered twice!) we know that this message is outdated and we already have newer information. Then we just drop the message. Otherwise we know this message is valid and we can use it. We then set our expected count to the same value as in the message.
So let's have a look at the Code (Todo 4 + 5):
- (void)sendPlayerPosition:(CGPoint)position {
#warning TODO 4 send the player position unreliable
self.outgoingCounter++;
CGPoint relativePosition = [selfgetRelativePosition:position];
PlayerPositionUpdateMessage *message = [[PlayerPositionUpdateMessagealloc] initWithPosition:relativePosition andMessageCount:self.outgoingCounter];
[selfsendMessageUnreliable:message];
}
First we increment our outgoing counter. This is the counter which is then included in the message. After that, we again need the relative position of the player. Last we initialize our message with the needed information and hand it over to our helper method. Note that we are using unreliable sending now!
- (void)parsePlayerPositionUpdateMessage:(PlayerPositionUpdateMessage *)message {
#warning TODO 5 parse the position update message
// sorry, but out of order -> just ignore
if(self.incomingCounter >= message.messageCount) {
NSLog(@"received out of order position update!");
return;
}
CGPoint absolutePosition = [self getAbsolutePosition:message.playerPosition];
self.incomingCounter = message.messageCount;
[self.networkDelegate playerPositionChanged:absolutePosition];
}
On the receiver's side we first compare the message count with our incoming counter (the expected count). If the incoming counter is bigger we know that we already received a newer package before. We then just drop the package by returning from the method. Otherwise the information is valid and we get again the absolute position of the player, set our incoming counter to the one in the message and notify the game scene about the position update.
This was the final step. Now you should be able to player the game over Game Center!
MultipeerConnectivity
As already stated, the MultipeerConnectivity framework offers a way to discover and communicate with nearby devices. either using Bluetooth or Wifi or even both.
There is a very interesting feature:

As you can see in the image, there a three different devices. One with only Bluetooth enabled, one with only Wifi enabled and one using both. That mean the first two devices do not know about each other directly. But the MultipeerConnectivity framework automatically solves tho problem by routing the data between device one and two over device three.
When using MultipeerConnectivity you should know about four important classes. The MCPeerID, MCBrowserViewController, MCAdvertiserAssistant and MCSession.
The MCPeerID describes the local device. You have to provide a display name. With this name other devices will identify the local device.
The MCBrowserViewController is a standard ViewController to find other devices just like the GKMatchmakerViewController. It will present a list of nearby devices to the user with the ability to connect to them. This is the active way to connect to another device.
The MCAdvertiserAssistant is responsible for making the Multipeer facilities available to other devices. This means that other devices can connect to your local device by the MCBrowserViewController and you can either accept or decline the connection offer. This is the passive way of connecting to a device.
The MCSession facilitates communication among all peers in a MultipeerConnectivity session. It is comparable to the GKMatch class. You can exchange data with other peers using MCSession and for example disconnect from the session.

The UML diagram for the MultipeerConnectivity is a bit more complex than the one for Game Center. We have the MultiPeerCommunication class which is the entry point for our MultipeerConnectivity support. It owns a MCSession for the communication with other peers, and a MCAdvertiserAssistant to be visible for other devices (passive way of connecting). The MCSession needs a MCPeerID to be able to identify the local device via a name (property of MCPeerID). The MCBrowserViewController also has a reference to the MCSession. It also has two properties to specify the amount of peers which can be in one session at the same time (including the local peer).
You will also notice that the ViewController and the AdvertiserAssistant both have a property called serviceType. It is a NSString, which must be the exactly the same on both devices, otherwise the devices will not find each other. You need this because MultipeerConnectivity uses Bonjour to find other devices which is Apples implementation of a zeroconf network. That means that the devices do not need a preconfigured network to exchange data with each other. There is no configuration needed because they can discover each other via multicast. But to identify the available services this service type is needed! Bonjour is also used for example in iTunes to find users who share their music library or to easily find network printers.

The first thing we need to do is changing the strategy. To do this, got to ViewController.m and change:
#warning TODO change the strategy
[MultiPlayerHelpersharedInstance].communicationStrategy = [[GameCenterCommunicationalloc] init];
To:
[MultiPlayerHelpersharedInstance].communicationStrategy = [[MultiPeerCommunicationalloc] initWithPlayerName:@"Your Name"];
Now we can go to TODO 6 and set up our MultipeerConnectivity session.
- (void)setupSession {
#warning TODO 6 setup up the MultipeerConnectivity Session
MCPeerID *peer = [[MCPeerIDalloc] initWithDisplayName:self.playerName];
self.session = [[MCSessionalloc] initWithPeer:peer];
self.session.delegate = self;
self.advertiserAssistant = [[MCAdvertiserAssistantalloc] initWithServiceType:@"space" discoveryInfo:nil session:self.session];
[self.advertiserAssistant start];
}
First we instantiate a MCPeerID with the name we get passed when initializing the MultiPeerCommunication class. Then we create our session and set the delegate property to self. Therefore we get notified when for example a peer connects or data is being received. After that we instantiate our advertiser assistant with the service type space and our session. By starting the advertiser we are visible to other devices which are searching for nearby devices using the MCBrowserViewController.
We just implemented the passive way of connecting. Now we can implemented the active one, where we search for other nearby devices using the MCBrowserViewController (TODO 7):
- (void)findMatch {
#warning TODO 7 find a match/other peers using MultipeerConnectivity
[self.advertiserAssistantstop];
MCBrowserViewController *viewController = [[MCBrowserViewControlleralloc] initWithServiceType:@"space"session:self.session];
viewController.delegate = self;
viewController.maximumNumberOfPeers = 2;
viewController.minimumNumberOfPeers = 2;
[HelperpresentViewController:viewController];
}
As you can see we first stop the advertiser. We are doing that because we do not want to be visible for other devices if we are searching! After that we just initialize the ViewController with the same service type we used for the advertiser before and our session. We then set the delegate to get notified when the user clicks done. Last thing we need to do is set the minimum and maximum number of peers and present the ViewController to the user.
After this final step you should be able to play the game also with the MultiPeerConnectivity framework.


Summary
In this tutorial we have seen why the Game Center and MultipeerConnectivity frameworks are useful when developing a multiplayer game. You know how to find matches respectively other players (devices) using these frameworks. You know how to exchange data over the network either using a GKMatch or a MCSession. You also know the theory behind multiplayer games and whats important to look at when designing a multiplayer game.
Here is a short table about the advantages and disadvantages of the two frameworks.

Some tips:
- Use the strategy pattern introduced to support both technologies
- Enable Game Center/MultipeerConnectivity support in Xcode to use it
- Register your app bundle id in iTunes Connect to use Game Center (See Helpful Links section: A tutorial about Leaderboards, Challenges and Achievements in Game Center)
- Check if the Game Center Sandbox is available: https://sandbox.itunes.apple.com/verifyReceipt
Helpful links:
- Official Game Center Guide
- How to make a simple multiplayer game by Ray Wenderlich
- Nearby networking with MultipeerConnectivity (Video)
- About Multipeer Connectivity by Apple
- Snap (Card Game by Ray Wenderlich)
- Uses deprecated GameKit API, but good example how to exchange packages with an object oriented network stack
- http://www.raywenderlich.com/12735
- A tutorial about Leaderboards, Challenges and Achievements in Game Center
References
- https://developer.apple.com/library/ios/documentation/NetworkingInternet/Conceptual/GameKit_Guide/Introduction/Introduction.html#//apple_ref/doc/uid/TP40008304-CH1-SW1
- https://developer.apple.com/library/ios/documentation/NetworkingInternet/Conceptual/GameKit_Guide/Matchmaking/Matchmaking.html#//apple_ref/doc/uid/TP40008304-CH9-SW1
- https://developer.apple.com/library/ios/documentation/MultipeerConnectivity/Reference/MultipeerConnectivityFramework
- http://www.raywenderlich.com/12735
- http://iphonedevsdk.com/forum/iphone-sdk-development/96012-is-the-sandbox-down-i-keep-getting-http-unavailable.html
- http://www.raywenderlich.com/3276/how-to-make-a-simple-multiplayer-game-with-game-center-tutorial-part-12
- http://devstreaming.apple.com/videos/wwdc/2013/708xbx3x7xusbzidl0j3acxest/708/708.pdf?dl=1
- https://developer.apple.com/library/ios/documentation/MultipeerConnectivity/Reference/MultipeerConnectivityFramework/Introduction/Introduction.html
- https://developer.apple.com/library/ios/documentation/MultipeerConnectivity/Reference/MultipeerConnectivityFramework/_index.html#//apple_ref/doc/uid/TP40013328
- http://en.wikipedia.org/wiki/Bonjour_(software)
- http://en.wikipedia.org/wiki/OSI_model
- http://en.wikipedia.org/wiki/User_Datagram_Protocol
- http://en.wikipedia.org/wiki/Transmission_Control_Protocol
- http://en.wikipedia.org/wiki/Game_Center
Images
In the order they appear.
- Game Center Icon
- Example Applications
- http://1.bp.blogspot.com/-VN8uai_77pg/TZTNonsIzmI/AAAAAAAAAxY/qdVvIjwUNGA/s1600/Doodle%2BJump%2BMultiplayer.jpg
- https://itunes.apple.com/de/app/real-racing-3/id556164350?mt=8
- https://itunes.apple.com/us/app/word-rally/id447075138?mt=8
- https://itunes.apple.com/de/app/carcassonne/id375295479?mt=8
- MultipeerConnectivity
- Network topologies:
- Bonjour Icon
- MultipeerConnectivity
- Plus and minus signs:
All other images were made by myself