“Tell me and I will forget.
Show me and I will remember.
Involve me and I will understand.
Step back and I will act.”
iOS Sensors & Core Motion
by Andreas Eichner
Table of Contents
1. Introduction
2. Tutorial Application
3. Sensor Overview
4. Camera
4.1 Choosing an image source
4.2 Receiving the image or canceling
5. Device Motion
5.1 Motion manager
5.2 Reference Frame
5.3 Device motion data sample
5.4 Retrieving CMDeviceMotion data
6. Location
6.1 Location sensing
6.2 Starting location updates
6.3 Receiving location updates
6.4 Reverse geocoding
7. Proximity Sensor
7.1 Enabling proximity sensor
7.2 Accessing the proximity state
8. Summary
8.1 References
1 Introduction
CoreMotion is a Framework provided by Apple, which gives us the possibility to easily access the data of the motion and movement of the iDevice. Therefore the Application has advanced options to create user-interactions and handling them.Furthermore, this tutorial covers how to use the camera, the proximity sensor and how to track your location in your very own application. In every section I will tell you some general information about the depending topic followed by some exercises so you can try out to get used to this topic. And finally there will be the solution code to these exercises.
2 Tutorial Application
To demonstrate the topics that are covered in this tutorial, I have implemented a small application that is available as XCode project.
CoreMotionExercise.zip (The solution project is in the summary)
It contains a few demos, each demo in one UIViewController, which are embedded in an UINavigationController. The user interface was generated using a UIStoryboard. There is also a version of the project, where parts of the implementation are missing, that can be used to do the assignments in this tutorial.These assignments are marked with //TODO comments in the regarding classes.The classes in which these assignments are in, are bundled in a group “Tutorials”.
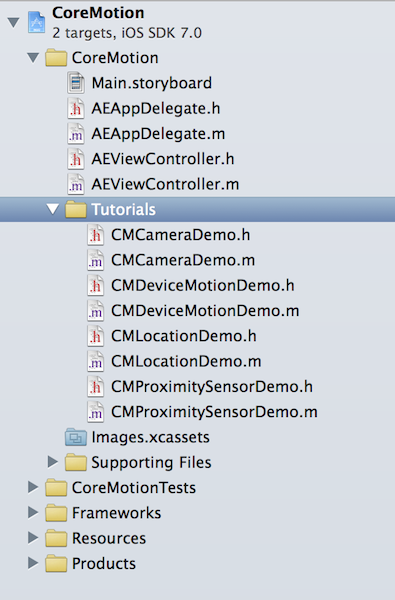
I always will mention in which class and method assignments currently are.
3 Sensor overview
Current iPhone and iPad models include the following sensors:
- Ambient Light Sensor: Measures the intensity of ambient light and is used for the auto-brightness feature of iPhones and iPads. This sensor cannot be read with an official API. There is a private API that can be used, but apps using this API are not App-Store compliant. This is why we won’t cover this sensor in this tutorial.
- Camera: Depending on the iDevice, it has above the display and on the backside a camera. Taken pictures are stored in the photolibrary.
- Tutorial: The Test-Application has a view in which we can use the camera or the photolibrary to choose an image and then display it on the view.
- Device Motion
- Accelerometer: The accelerometer works like a digital water level. It can detect the attitude of the device in relation to gravity (it cannot detect rotation around gravity)
- Gyroscope: The gyroscope detects device attitude in all directions and is more accurate than the accelerometer in that matter. But it cannot detect acceleration caused by the user (e.g. when shaking the phone)
- Magnetometer: The magentometer works like a digital compass and detects magnetic north. It can be distracted by interference caused by metal nearby and does not work very well indoors.
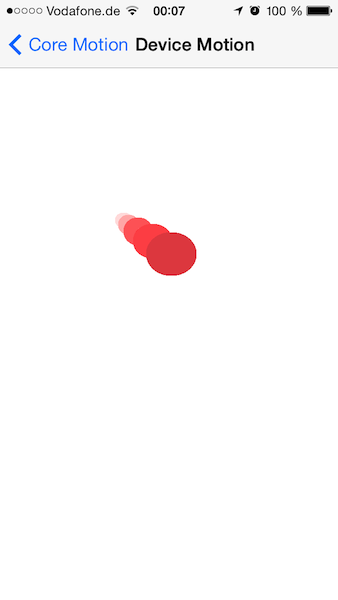
- Tutorial: The Test-Application has a view, in which we can see a Ball, which is moving and scaling depending on the motion of the iDevice.
- Assisted GPS: The GPS (or GLONASS) receiver is used for determining the phones location on earth. iOS devices use an assisted GPS, meaning that not only GPS data is used to determine the location. In addition to the GPS information, the iOS device also uses nearby WiFi networks andcell towers to localize the user. The GPS (or GLONASS) receiver is used for determining the phones location on earth. iOS devices use an assisted GPS, meaning that not only GPS data is used to determine the location. In addition to the GPS information, the iOS device also uses nearby WiFi networks and cell towers to localize the user.
- Tutorial: The Test-Application has a view, in which we can see a map. There you can locate yourself, track your movement and gather information about the area around you.
- Proximity Sensor: This sensor is placed next to the headphone on iPhones (not available on iPads). It detects if an object is close to the device and is used to turn the screen black whenever the uses raises the phone to her ear. We can read the sensor as a Boolean value (near or far)
- Tutorial: The Test-Application has a view, in which I implemented a little game. There is count down, which determines when you have to trigger the proximity sensor.
4 Camera
Initially we want to discuss how to use the built-in cameras in the iDevice to get pictures or if there is no camera available how to get images out of the photo library and use these images in our application.
The central object is called UIImagePickerController It is a view controller of the system that presents an user interface to the user, which allows the user to choose an image from his photo library or take a new picture using the camera. On the iDevice, this user interface is usually presented modally (which can be achieved by calling presentViewController: on another view controller object).
To present the image picker controller with a camera interface, we need an object that implements the UIImagePickerControllerDelegate and the UIImagePickerControllerDelegate protocol, which we set up as the delegate of the image picker before presenting it. Before we can show the picker, we have to make sure, that a camera is available (some devices do not have a camera or the user may have blocked access to the camera) and react properly. We do this by calling isSourceTypeAvailable:UIImagePickerControllerSourceTypeCamera on the image picker controller.
4.1 Choosing an image Source
Depending on the availability of the camera we have to choose the source (camera or photolibrary) where we want to retrieve the image from.
This is easily done by calling setSourceType: with its needed source type:
- UIImagePickerControllerSourceTypeCamera
- UIImagePickerControllerSourceTypePhotoLibrary
Exercise 1
class : CMCameraDemo.m,
method : -(IBAction)takePicture:(id)sender);
In the first exercise you have to instanciate the UIImagePickerController and set its delegate properly.
Then choose the source of our pictures, depending on the existence of a camera.
At last present this image picker.
|
// Here is my Solution Code
picker = [[UIImagePickerController alloc] init]; picker.delegate = self; if(![UIImagePickerController isSourceTypeAvailable:UIImagePickerControllerSourceTypeCamera]) { NSLog(@"No camera available."); [picker setSourceType:UIImagePickerControllerSourceTypePhotoLibrary]; } else { [picker setSourceType:UIImagePickerControllerSourceTypeCamera]; } [self presentViewController:picker animated:YES completion:nil]; |
4.2 Receiving the image or cancelling
When the user has finished choosing the picture (or cancelled the action) our delegate object receives the callback method imagePickerController:didFinishPickingMediaWithInfo:, which should be handled appropriately.
In our case that means we want to get the chosen image and display it in the active view.
The image will be in the dictionary, which is given to this method. The picture itself is the value to the key UIImagePickerControllerOriginalImage.
Exercise 2
class : CMCameraDemo.m,
method : - (void)imagePickerController:(UIImagePickerController *)picker didFinishPickingMediaWithInfo:(NSDictionary *)info;
In the second exercise you have to get the previously chosen picture and display it in the view.
|
// Here is my Solution Code
UIImage *image = info[UIImagePickerControllerOriginalImage]; imageView.image = image; |
5 Device Motion
An instance of CMDeviceMotion encapsulates measurements of the attitude, rotation rate, and acceleration of a device.An application receives or samples CMDeviceMotion objects at regular intervals after calling on of the following methods of the CMMotionManager class:
- startDeviceMotionUpdatesUsingReferenceFrame:toQueue:withHandler:
- startDeviceMotionUpdatesToQueue:withHandler:
- startDeviceMotionUpdatesUsingReferenceFrame:
- startDeviceMotionUpdates
The accelerometer measures the sum of two acceleration vectors: gravity and user acceleration. User acceleration is the acceleration that the user imparts to the device. Because Core Motion is able to track a device’s attitude using both the gyroscope and the accelerometer, it can differentiate between gravity and user acceleration. A CMDeviceMotion object provides both measurements in the gravity and userAcceleration properties.
5.1 Motion Manager
The interaction between your app and the CoreMotion framework is done via the CMMotionManager class. Before we can read the information of device motion, we have to set up the motion manager.CoreMotion provides two modes of accessing the device motion samples: push and pull. The push- based API sends incoming data samples to your application as soon as they arrive. This method is useful when you intend to record device motion data and it is important that we get every single sample that is generated by the API. In most cases though, you need the current device orientation or movement for controlling your app (e.g. for controlling a game player).In this case, it is better to use the pull-based API, because we canask the motion manager for the latest sample of data whenever we need it (most commonly this is done when your game logic is updating). We will discuss and present the latter approach in this tutorial.
5.2 Reference Frame
Before it is possible to read the data samples from the framework, we have to have a closer look at how the attitude and acceleration of the framework is represented. All values recorded by the device framework are relative to a reference frame. This frame is a 3-dimensional coordinate system with 3 axis. The z-axis always decreases towards the gravity (center of the earth), while the direction of the x-axis can be determined by you when setting up the motion manager.
There are 4 possibilities:
- X arbitrary: The x-axis points in an arbitrary direction that is chosen randomly when the motion updates begin
- X arbitrary corrected: Works the same as the previous option, but the direction of the x-axis is corrected over time (meaning that its direction is consistent for a longer time of recording). This option involves more processing power and should only be chosen if required
- X to true north: X points to the geographic north pole. This options takes longe to initialize, since the magnetometer data is required while setting up the reference frame
- X to magnetic north: Same as the above option, but the x-axis points to the magnetic north pole instead of the geographic north pole How to choose a reference frame, will be shown in the next section. A set up reference frame looks as follows:
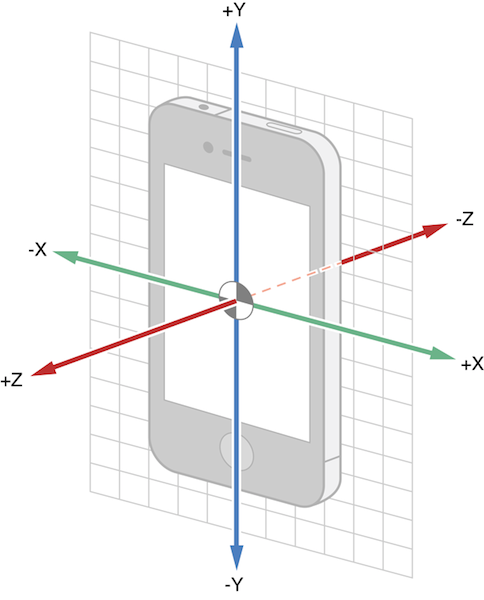
Reference frame used in CoreMotion (-Z points to gravity) This reference frame allows it to represent the device acceleration by indicating how fast the device is moving in all three directions. To represent the attitude of the device, threeangles (in radians) are used that increase around the three axis. You can use the right-hand-rule to determine in which direction the angles are growing around the axis: If you make a fist with your right while stretching our the thumb, the thumb will point in the positive direction of the axis, and the other four fingers point the direction of growing angle values.
The three attitude angles are illustrated in the following image:
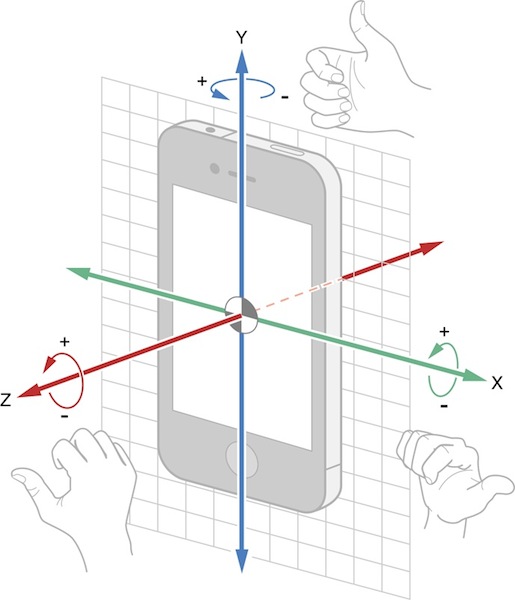
The three possible angles (see above) are called:
- Pitch: A pitch is a rotation around a lateral (X) axis that passes through the device from side to side
- Roll: A roll is a rotation around a longitudinal (Y) axis that passes through the device from its top to bottom
- Yaw: A yaw is a rotation around an axis (Z) that runs vertically through the device. It is perpendicular to the body of the device, with its origin at the center of gravity and directed toward the bottom of the device
5.3 Device motion data sample
Now that we know how device acceleration and attitude can be represented, we can have a closer look at the data that the CoreMotion framework returns to your app.
The received (push) or retrieved (pull) device motion samples are encoded into an instance of CMDeviceMotion which encapsulates one sample of device motion data at a given time. A CMDeviceMotion class in- stance includes (among others) the following properties:
- attitude: The current attitude of the device, relative to the chosen reference frame (3 angles, in a text to CMAttitude type)
- rotationRate: How fast the device has moved around all 3 axis since the last device motion sample (also 3 angles, in a CMAttitude type)
- gravity: A vector pointing along gravity relative to the current reference frame (usually (0,0,-1), encoded in a CMAcceleration type)
- userAcceleration: How fast the device is accelerated by the user (in contrast to acceleration by gravity) along all 3 axis of the reference frame (a CMAcceleration type). The data type CMAttitude is a C-struct containing the 3 angles pitch, yaw, roll as floating point values. The data type CMAcceleration is a C-struct containing the 3 vector components x, y, z as floating point values.
5.4 Retrieving CMDeviceMotion data
If we want to retrieve device motion data samples from the CoreMotion API, you have to specify a desired reference frame and an update interval and then start the motion updates.
The motion manager updates can be started with four different reference frames:
- CMAttitudeReferenceFrameXArbitraryZVertical
- CMAttitudeReferenceFrameXArbitraryCorrectedZVertical
- CMAttitudeReferenceFrameXMagneticNorthZVertical
- CMAttitudeReferenceFrameXTrueNorthZVertical
These values correspond to the 4 options you have for the reference frame (as discussed above).
Exercise 1
class : CMDeviceMotionDemo.m,
method : -(void)viewWillAppear:(BOOL)animated;
Save an instance of CMMotionManager in the property motionManager and set its deviceMotionUpdateIntervalto 1/60.
Finally start updating the motion of the iDevice using the corrected reference frame.
|
// Here is my Solution Code
self.motionManager = [[CMMotionManager alloc] init]; self.motionManager.deviceMotionUpdateInterval = 1.0 / 60.0; [self.motionManager startDeviceMotionUpdatesUsingReferenceFrame: CMAttitudeReferenceFrameXArbitraryCorrectedZVertical]; |
After you have configured the motion manager and started the device updates, you can pass a device-motion message to the motion manager at any time to get a sample of device motion data. The method returns an instance of CMDeviceMotion, which encapsulates the current device attitude, acceleration and more as discussed in the previous section.
Exercise 2
class : CMDeviceMotionDemo.m,
method : -(void)updateDeviceMotion;
Get the deviceMotion of the just instantiated motionManager and extract its attitude and its userAcceleration.
Then call updateBallWithRoll:Pitch:Yaw:accX:accY:accZ: with the appropriate values.
|
// Here is my Solution Code (very detailed)
CMDeviceMotion *deviceMotion = self.motionManager.deviceMotion; if(deviceMotion == nil) return; } CMAttitude *attitude = deviceMotion.attitude; float roll = attitude.roll; float pitch = attitude.pitch; float yaw = attitude.yaw; float accX = userAcceleration.x; float accY = userAcceleration.y; float accZ = userAcceleration.z;
[self updateBallWithRoll:roll Pitch:pitch Yaw:yaw accX:accX accY:accY accZ:accZ];
|
Important: Check if the object returned by deviceMotion is not nil, since the initialization of the device motion manager may take some time and no device motion data is available during the initialization phase.
Last but not least it is good practice to stop updating the motion of our iDevice.
Exercise 3
class : CMDeviceMotionDemo.m,
method : -(void)viewDidDisappear:(BOOL)animated;
Stop updating the iDevice movement and set the property motionManager to nil, so that the next instantiation may work properly.
|
// Here is my Solution Code
[self.motionManager stopDeviceMotionUpdates]; self.motionManager = nil; |
Now if you start the application the device motion view should show you a moving and scaling ball as in the screenshot below.
6 Location
All iOS devices are location aware, meaning that we can request the current location of the user (on earth). Some devices do not include a GPS receiver (iPad WiFi models and iPhone classic) but support device location requests anyway, because the data does not rely solely on GPS data.
6.1 Location sensing
To determine the current location of the device on earth (including the altitude), iOS device combine multiple data sources. This approach is called assisted GPS:
GPS or GLONASS: If the device has a GPS or GLONASS receiver built in, timing information sent from satellites, is used to determine a location
WiFi networks: The device can use an online database to look up the geographic location of nearby WiFi networks that are visible to the device
Cell towers: If the device has GSM, UMTS or LTE network support,it can look up the geographic location of visible cell towers in an online database to perform a triangulation via the signal strength of the cell towers to determine the users location
6.2 Starting location updates
Getting the device location data works very similar to the device motion. But unlike with device motion updates, we do not pull the current location information from the API, but we receive a delegate callback whenever the framework senses a location change.
The involved framework is called CoreLocation and its central object is called CLLocationManager. To receive location updates, we need an object that implements the CLLocationManagerDelegate protocol (which includes the callback method) and we also have to configure the location manager. We can choose the accuracy of the location data (depending on the use case in your app) and we also have to choose a distanceFilter, which tells the location manager that it has to send we a new location whenever the device moves more than this value (in meters).
Exercise 1
class : CMLocationDemo.m,
method : -(IBAction)startUserLocalization:(id)sender;
Instantiate the CLLocationManager and set its delegate to the active view Controller.
Set the distanceFilter to 1 and the desiredAccuracy to 10 meters.
Finally start updating the location.
|
// Here is my Solution Code
locationManager = [[CLLocationManager alloc] init]; locationManager.delegate = self; locationManager.distanceFilter = 1.0f; locationManager.desiredAccuracy = kCLLocationAccuracyNearestTenMeters; [locationManager startUpdatingLocation]; |
This solution sets up a very accurate location determination. You can choose between 6 accuracies set via desiredAccuracy:
- kCLLocationAccuracyBest
- kCLLocationAccuracyBestForNavigation
- kCLLocationAccuracyNearestTenMeters
- kCLLocationAccuracyHundretMeters
- kCLLocationAccuracyKilometer
- kCLLocationAccuracyThreeKilometers
6.3 Receiving location updates
After we have configured and started the location manager, our delegate class instance receives a callback on the method locationManager:didUpdateLocations: every time the location changes more than the value of distanceFilter in meters.
The second argument of the callback is an array of all location data samples that have been collected since the last time the callback was fired. The latest sample of data is at the end of the array:
CLLocation *location = [locations lastObject];
CLLocationDegrees latitude = location.coordinate.latitude;
CLLocationDegrees longitude = location.coordinate.longitude;
Each entry in the locations array is an instance of CLLocation, which encapsulates the following information:
- coordinate: A set of coordinates (latitude and longitude) that describes the users location on earth
- altitude: The measured altitude of the user (in meters above sea level)
- horizontalAccuracy: Accuracy of the coordinate (in meters plus-minus)
- verticalAccuracy: Accuracy of the altitude (in meters plus-minus)
- timestamp: The date and time at which this location sample was taken
- speed: The speed of the device (when moving) in meters per second
- course: The course of the device (when moving) in degrees (measured clockwise around a compass: 0 and 360 is north, 90 is east, 180 is south, 270 is west)
Exercise 2
class : CMLocationDemo.m,
method : -(void)locationManager:(CLLocationManager *)manager didUpdateLocations:(NSArray *)locations;
Get the newest location, extract its coordinates and update the map location.
Then call reverseGeocodeLocation: (More information in the next exercise.)
|
// Here is my Solution Code
CLLocation *location = [locations lastObject]; CLLocationDegrees lat = location.coordinate.latitude; CLLocationDegrees lon = location.coordinate.longitude; [self updateMapLocationToLatitude:lat longitude:lon]; [self reverseGeocodeLocation:location]; |
6.4 Reverse Geocoding
Reverse geocoding means to resolve the coordinates, which we just gained, back to readable information about that place.
Our next task is to display the name of the current position in an already prepared label in the view.
Exercise 3
class : CMLocationDemo.m,
method : -(void)reverseGeocodeLocation:(CLLocation*)location;
Return if error contains any message, and log this message. Also return if the placemarks are empty.
Otherwise extract the newest placemark out of the array and print it on the locationNameLabel.
|
// Here is my Solution Code
if(error != nil) { NSLog(@"Geocoder error: %@", error); return; } else if(placemarks == nil) { return; } CLPlacemark *placemark = (CLPlacemark*)[placemarks objectAtIndex:0]; locationNameLabel.text = [placemark name]; |
Finally the application shows you a mapview and if you locate yourself, it starts tracking you position and displays the placemark-name.
![]()
7 Proximity Sensor
As described in the overview, the proximity sensor detects objects near the phone and is primarily used to detect when the user raises the phone to her head. The sensor recognizes the existence of a nearby object via infrared, but it does not measure the distance to it. There are only two possible states: object is nearby / no object is nearby.
This is perfectly represented by a Boolean value.
7.1 Enabling proximity sensor
To gather the information whether there is an object nearby the phone or not, we can get the singleton instance of UIDevice and retrieve its property - proximityState.
This property is also key-value compliant, which means that a state change can be notified using key-value-observing on the property key-path.
But first of course we have to start monitoring the proximity sensor.
// Get current device
UIDevice *device = [UIDevice currentDevice];
// Enable monitoring the proximity sensor
[device setProximityMonitoringEnabled:YES];
From now on the proximity sensor keeps updating its status and our next task is to observe this status. The observer in our case should be the viewController we are currently in, i.e. self.
[device addObserver:self forKeyPath:@"proximityState" options:NSKeyValueObservingOptionNew context:nil];
Recommendable these three lines of code are always started in the viewDidLoad method of the depending view.
Very important for the battery charge:
Stop observing and monitoring the proximity Sensor, when the view disappears.
Exercise 1
class : CMProximitySensorDemo.m,
method : -(void)viewWillDisappear:(BOOL)animated;
Remove the observer and stop monitoring the sensor.
|
// Here is my Solution Code
UIDevice *device = [UIDevice currentDevice]; |
7.2 Accessing the proximity state
To finally get the data of the proximity sensor we can access now the property proximityState of the current device.
BOOL deviceIsClose = [[UIDevice currentDevice] proximityState];
As the name of the BOOL already tells, YES means that an object is near the phone and NO means there is no object.
Furthermore, we can now trigger actions in case of proximity state changes.
BUT, always when the state changes while the monitoring is active, the phone will react properly.
This means the screen will blackout if an object near and it will lighten up if not.
Exercise 2
class : CMProximitySensorDemo.m,
method : -(void)observeValueForKeyPath:(NSString *)keyPath ofObject:(id)object change:(NSDictionary *)change context:(void *)context;
Extract the proximity state if the given keyPath is equal to proximityState and trigger a custom action by calling deviceProximityChangedTo:.
|
// Here is my Solution Code
if([keyPath isEqualToString:@"proximityState"]) { BOOL deviceIsClose = [[UIDevice currentDevice] proximityState]; [self deviceProximityChangedTo:deviceIsClose]; } |
8 Summary
Hopefully this tutorial made somehow clear why and how to handle not only important sensors like the gyroscope, the accelerator and the magnetometer via the Framework CoreMotion, but also the camera, the location service and the proximity sensor.
There are really a lot of different ways and application where you can gain profit of them.
Here also is the complete XCode project with all solutions to the exercises:
If there is anything unclear or some questions left, do not hesitate to write me an email and I will answer you as soon as possible.
8.1 References
WWDC Videos:
-
Camera:
https://developer.apple.com/wwdc/videos/?include=610#610
-
Location:
-
MapKit:
-
Core Motion:
Apple Documentation:
-
Camera & Photo Library:
-
Core Motion:
-
Motion Events:
-
Locating:
